まずはここから!ネクタイの構造も分かります。
楽しんで作ってみて下さいね。
Begin from making a basic drawstring bag !
Then, you will understand the tie construction.Enjoy reuing.
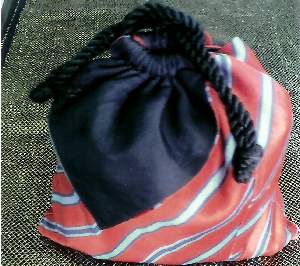 基本の巾着 [Basic Drawstring Bag]
■用意する材料(Materials)
ネクタイ(Tie) 1本(pc)
うら布(Lining) 70cm×35cm
ひも(String) 110~120cm
■準備
ネクタイの裏布と芯をはずして、表布一枚にする。
Remove the interlining and the lining from a tie,
leaving a piece of tie cloth.
真ん中の「はぎ」をほどいて、大剣と中小剣にわける。
Undo the center seam.

■作り方
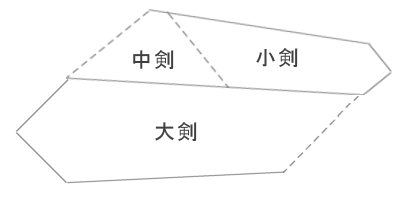
(1) 2枚になったネクタイを図のように上下に置き、中表にしてぬい、1枚の変形六角形にする。
Arrange the 2 separated pieces as illustrated, and sew the line A while keepng the fabric taut.
![]() ポイント(Point)
ポイント(Point)
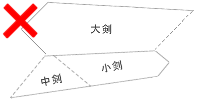
・大剣の剣先の延長線上に中剣のはぎが、揃うように置きます。右の図のような状態では、ぬいあわせできません。
If arranged as right, the Large and the Middle and Small make a V-formation to defysewing up.
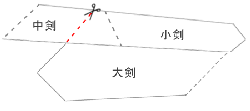
・大剣より中小剣が長い場合は、ぬった後にあまっている部分を右の図のようにカットして、変形六角形にします。
If the Middle and Small is longer than the Large, cut off the protruded part after sewing up the line as illustrated.
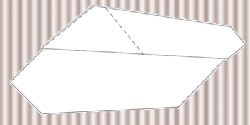
(2) 裏布にネクタイ布を中表にして乗せ、裏布を裁断する。
Put the tie cloth with the inside downward on the lining,
and cut the lining to the tie cloth.
![]()
![]() ポイント(Point)
ポイント(Point)
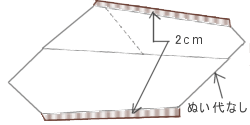
・両方の剣先(図の左右)は、ぬい代なし。両サイド(図の上下)は2cmのぬい代をとる。
Take no seam allowance on both sword tips.Take 2cm seam allowance on both sides.
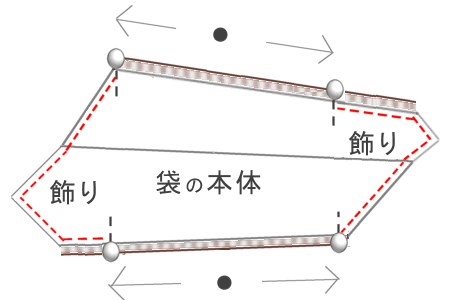
(3) 袋の本体と飾りの部分を別けてマチ針を打ち、飾りの部分(赤色の破線)をぬう。
Separate the bag body and the flag part, stick marking pins,
and the flag part(red broken line).
![]() ポイント(Point)
ポイント(Point)
・袋本体の両サイド(●)の長さを揃えます。
Take the part(![]() ) to same length.
) to same length.
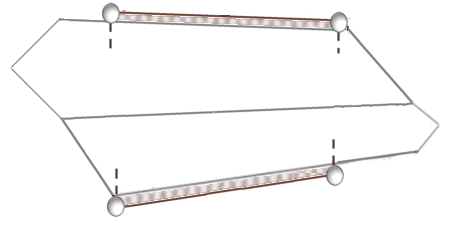
(4) 表にひっくりかえして、もう一度、ぬい止まりの部分にマチ針を打ちなおす。
Turn the inside out to have the top outside,
and stick marking pins again into the seam ends.
![]() ポイント(Point)
ポイント(Point)
・ひっくりかえす時、剣先の縫い目にそって直角に折っておくと、きれいに角がでます。
To keep the corners sharp, fold the cloth along tie seams before turning inside out.
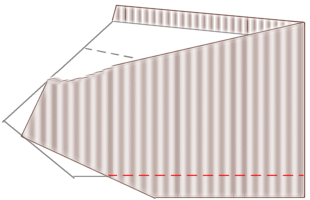
(5) 袋本体の両サイドを、裏布と表布、4枚重ねてぬいます。
Sew both sides of the bag body with the 4 cloths(2tie cloths and 2 linings)
![]() ポイント(Point)
ポイント(Point)
・長方形ではないので、片方をぬった後、もう片方を引きよせて、4枚重ねてぬいます。
At this time, the bag body is not rectangular, sew one side first, then pull the other side and sew 4 cloths together.
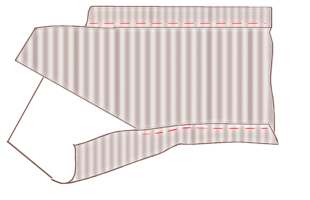
(6) 裏布の2cmのぬい代で、脇のしまつをする。
Treat both sides of the linings with 2cm seam allowance.
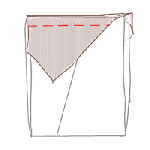
(7) ひっくり返して表にする。飾りを外側に折って、上から約2cm幅でぬい、ひも通しにする。
Turn the inside out to have the top outside. Fold the flap part outside, sew it at 2cm from the above edge to make a string passage.
![]() ポイント(Point)
ポイント(Point)
・ひも通しは、使うひもの太さで幅を決めます。
Width is decided by the thickness of the string used.
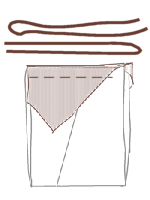
(8) ひもを通して完成!
Pass the strings, finish!
![]()

![]() ポイント(Point)
ポイント(Point)
・右から通して右にだし、玉結びする。左から通して左にだし、玉結びする。
The string passes from the right, puts out to the right, and is make a knot.
One another passes from the left, puts out to the left, and is make a knot.
